
Hello again, welcome to week two of the Blergh. This week, we’re going to continue going
on with practise exercises and we’re going to look at some ways to help practise your
tones. I’m assuming you’ve already watched our
Djembe Technique – Tones video on the web site. If you haven’t, take a couple of minutes
to log into African Drumming Online, and there’s a technique section, djembe technique, and
tones video’s there. It goes for about two and a half minutes,
I think, and it is a bit more in-depth on, you know, exactly how to get a good tone. But today we’re just going to work on, assuming
you already know that, how to practise that sound. So, from that technique video, you might remember
– if you just watched it, you will remember – I emphasised mainly three points.
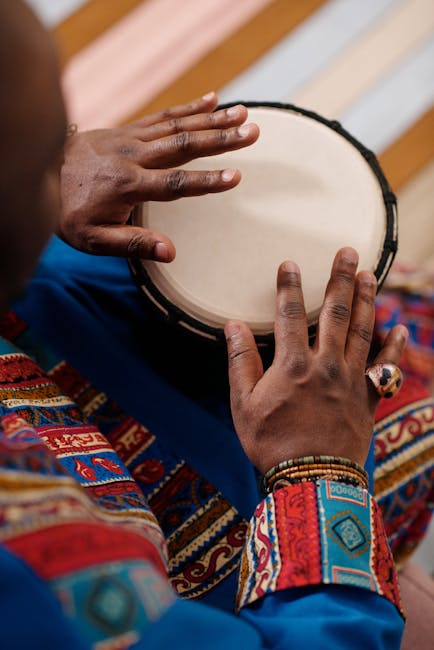
So, the first point was bringing your hand
back, making sure when your hand’s back, the fingers are ready, the wrist is back a
little bit – no stiff wrists – that’s the first point. Second is how you hit the drum, making sure
you’re hitting it with all your fingers. And the third point is making sure you bring
your hand back and you do it quickly so the sound rings out. So they’re the three main points that we’re
going to focus on while we’re practising tones. Additionally, if you can do this practise
in front of a mirror or something, it feels a bit weird – I think I recommend it to
a lot of people and I’m not sure many people try it out because it seems like it’ll freak
them out – but if you can practise in front of a mirror, sometimes you can actually see,
you know, things that are a bit odd with your technique.
So, sometimes your hand’s only coming back
here, or you can notice, oh, my wrist’s not going back, or, this hand goes here and
this hand goes here – things like that. So if you can practise in front of a mirror,
that can be helpful. So, before we get onto the actual exercise
I want to show, a lot of people when they’re first trying tones, or if they’re beginners
and stuff, you can get some sort of sound out of it, but sometimes it’s not like a
clean, nice, round sound. I talk about that in the other video. But if you do want to try and get a clean
sound and you’re finding it’s not quite happening, or it’s not consistent, one thing
that you can just try just like, as a little extra thing, is just the second of those three
points.
So, the second point was just making sure
your fingers are actually hitting the drum all together and, kind of, at the same time. So, what you can do to practise that is just
practise actually choking your hand on the drum, and sometimes I recommend students do
this just because you can kind of teach your hand what it feels like to hit the drum cleanly
for a tone.
So, like, that’s not a good sound, you don’t
want it to actually sound like that, but sometimes you might find that one finger’s not hitting
at the same time, or you’re only hitting with a little bit of your fingers, or something
like that, and sometimes just doing that, you can notice, ‘oh, hang on, my fingers
aren’t touching the drum when I’m finished’, and then you have to kind of press them in. So, what I generally students to do is when
you’re doing that kind of practise, hitting the drum, making sure you’re hitting with
all your fingers, and then just kind of grip it, press it a little bit, just to make sure
everything’s touching.
And that’s sort of like a preliminary exercise
if you’re just new to tones, and doing that can help teach your hand what it feels like
to get a good tone. So, once you’ve got that going, here’s
the exercise. First thing is, it’s a good idea to set
a timer. So, if you’ve got a phone, like a smart
phone or something, or if you’ve got an egg timer – whatever it is, I don’t care
– set it, I’d recommend, if you’re just getting started, just set it for a minute. And the reason for that – one thing is that
it’ll help you, I’ll talk later about it, but it’ll help you track your progress,
but also it gives you, like, a realistic and kind of set time that you’re going to spend
practising.
So, rather than sort of going ‘I’m going
to practise two hours a day’, when you’re never going to get around to it, just having
one minute to do a very set, simple exercise, is a lot more achievable. So, I’d recommend starting just for one
minute for this exercise. Now, the exercise, just to put it simply,
is just to play two good tones with one hand, then two good tones with the other hand, and
keep switching, and we’re going to keep track of how many we do. So, every time you move from one hand to the
other, you increase your count by one. So, I’d start with… that’s two hits
on my right hand, that’s one… That second one wasn’t very good… That’s two hits for my left hand, that’s
two… And so on.
So we do that for the time set, so if it’s
a minute, we do that for a minute. So that’s pretty simple. The things you’re focusing on with that
which actually make it more difficult is, while you’re doing that and the way that
you assess something as being a ‘good’ tone rather than a ‘bad’ tone, or an ‘evil’
tone, is mainly those three points that I mentioned earlier. So, making sure your hand’s starting from
back here, hitting, making sure you’re getting that nice clean sound, all your fingers are
hitting the drum at once, and then bringing your hand back and making sure the sound rings
out, so you’re not choking it, you’re letting the sound come out, and your hand
should come back here to where you started, which means you’re ready to do your next
hit.
So, that’s what a ‘good’ tone means. And that’s why it can help to have a mirror
or something, because sometimes it can be hard to keep track of… maybe you’re doing
this, and you’re concentrating so hard on what the sound is, that you’re not focusing
on your hands. It might take a while to get used to it, but
that’s the exercise. So just to give you a bit of an example of
how it would work: set the timer, OK, it’s counting down from a minute. I’m going to go, so I’ve got right hand
starting, starting with my hand back, hitting it cleanly, coming back… That’s one good tone… That’s two good tones, so I move to the
other hand, my count is 1.
You’ve got to keep some stuff in your head,
but hopefully that’s not too hard. Left hand… That’s one good one… Two good ones. Now to my right hand. And take your time, there’s no race, you
don’t need to worry about going fast, the point is to get your sounds good. As you get better, it’ll get easier… Now, that one was pretty sloppy, so that doesn’t
count… That’s a good one… That one wasn’t very good… That’s two good ones, now I move to my left
hand, I’m on three… OK, one… two, back to my right hand, and
so on. And eventually the time will run out and you
get a break. Now, this exercise is part of a series that
I mentioned I’m going to be doing throughout the first few weeks of this blergh, and what
I’ve done to help you keep track of it is I’ve made a worksheet, which should be up
on the screen now – it looks like this if it is – and that worksheet, it’s got seven
days so you can have it spread over a week, you can print out as many as you want, and
basically it’s got a little place to mark in how much time you’re going for, so just
start at a minute, and how many you get up to, so how many pairs of tones.
I did it just sort of slowly by myself and
I think, for this exercise, a good kind of point to start is if you can get about 18,
I think that’s pretty fair – that means that you’re sort of going slowly, like this,
if you can get 18 pairs in a minute, of pairs of pairs, then that’s just a good benchmark. It’ll be different for everyone, but I think
it’s good to just have some idea of where things lie. So, go and get that sheet – the link’s,
there’ll be links in the thing below, or on the video, I’ll work that out when I
get to actually editing it. In addition to that sheet, there’s also,
I’ve already, I’ve just written up the exercises I’m going to go through for the
next few weeks, in just sort of brief little things to remind you, uh, so if you want to
jump ahead and try the other exercises, like for basses, and other things like that, it’ll
be up on the screen, magic happening, and hopefully you can find that.
If you have any trouble finding things, send
me an email. Now, while I just made these exercises up
– uh, shh, don’t tell anyone – uh, I think it’s good to have them, sort of, recorded
like this. So, I would really encourage you to use the
sheet, like, if you’re actually committed to practising and improving, having a record
can really help, because, not only does it keep you accountable, for like, how many days
you’ve been practising, and how regularly, things like that, but, it’s also good while
you’re practising, to see some progress.
So, you might see on the first time you did
that tone exercise you did 18 hits in a minute. And maybe the second time you did it, 18 as
well. And then, then a couple of times later, you’re
doing 22. And then a couple of times later, you’re
doing 23, or whatever, and you can gradually see ‘OK, I must be getting better because
the numbers are going up’. So, that’s really the only reason for measuring
them, it’s just for your to compare against yourself, and it’s not a race – there’s
no winners in drumming – but I really would recommend keeping a written record. I know it’s one of those things that’s
like, ‘uh, I don’t want to do it’, and I’m pretty bad at practising myself, to
be quite frank, but putting up little systems like this, having a set period of time, making
yourself accountable on a sheet, setting a schedule, things like that, doing one minute
a day of this is better than doing nothing.
So, see how you go with that. So, that’s it for today. I hope you found it helpful, and if you did
find it helpful, you know, feel free to let me know, by commenting, sending me an email,
doing all the Facebook-y Youtube things like Liking, Sharing, all that sort of stuff. And also if you found it useful, chances are
other people will too, so share it around, send it to anyone you might think’s interested,
and yeah, let me know how you go. So, that’s it. See you next week! Thanks for watching the African Drumming Online
Blergh. If you have any feedback, suggestions, or
requests for future Blergh topics, please send me an email at jacob@africandrummingonline.com. If you’re not already an African Drumming
Online member, you can join up, free, to get access to all our drumming videos at africandrummingonline.com. Thanks very much..